How to create and store a strong Google password with ExpressKeys


A Google password protects Gmail, Drive, YouTube, and every other Google service linked to the account, so a weak or reused password puts all of them at risk. Our free password generator can create a strong, random Google password without a subscription. To store the password as well, ExpressKeys, our password manager, can generate it and save it in an encrypted vault that syncs across your devices. ExpressKeys also flags the password if it’s weak, reused, or exposed, and it can store your Google 2-step verification codes and passkeys.
The password manager is included with the ExpressVPN Advanced and Express Pro plans and is also available as a standalone subscription through the ExpressKeys app.
Create a strong Google password with the free password generator
Our free password generator creates a random password as soon as you open the page. The password is generated on your device and never sent over the internet. To change it, use the Password length slider or the Character types checkboxes, then select Regenerate.
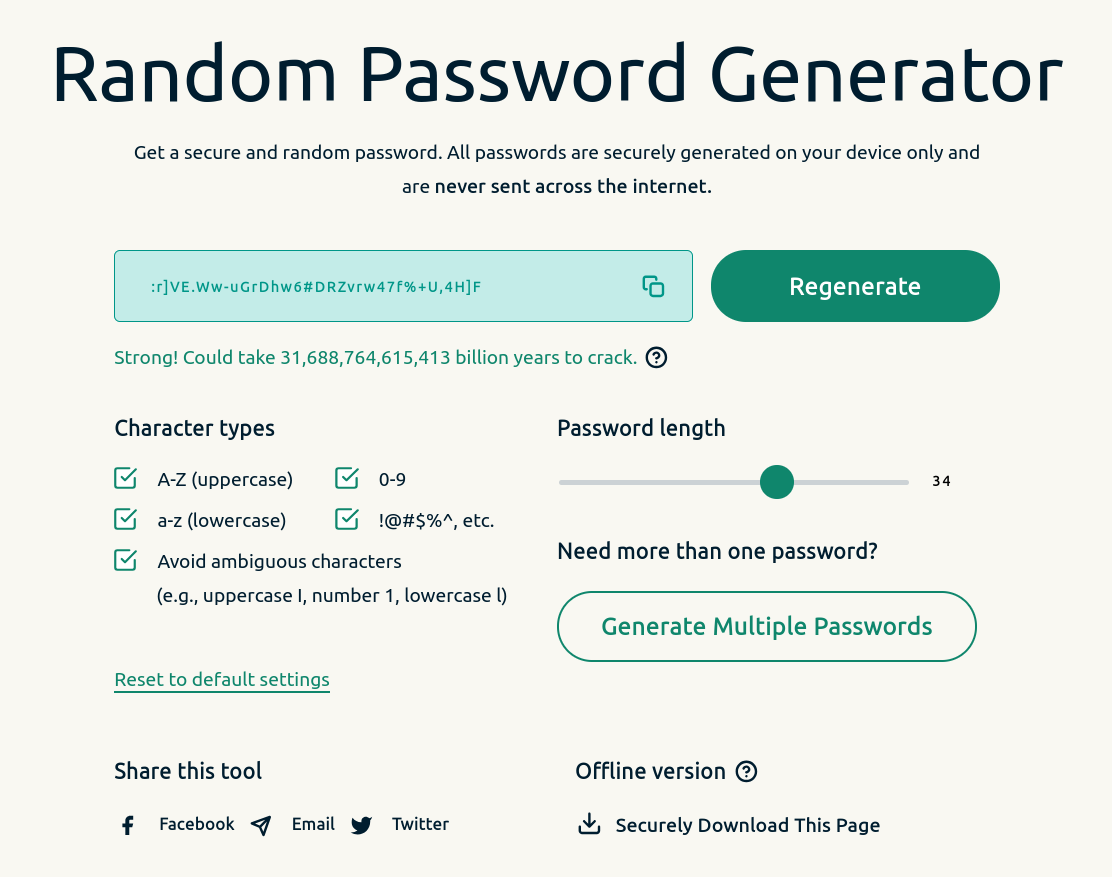
When you’re happy with the password, press the copy button and paste it into your Google Account password settings.
The generator doesn’t save the password, so you’ll need to store it somewhere safe yourself. ExpressKeys, on the other hand, generates the password and saves it to an encrypted vault in the same step.
How to set up ExpressKeys
ExpressKeys requires an active subscription, either through an eligible ExpressVPN plan or bought in the ExpressKeys app. It works on iOS 18, Android 13, and macOS 14 or later. It’s also available as a browser extension for Chrome, Edge, Brave, and Firefox.
These steps are for iOS. The setup is similar on other devices, with small differences covered in the guides for Android, macOS, or the browser extension.
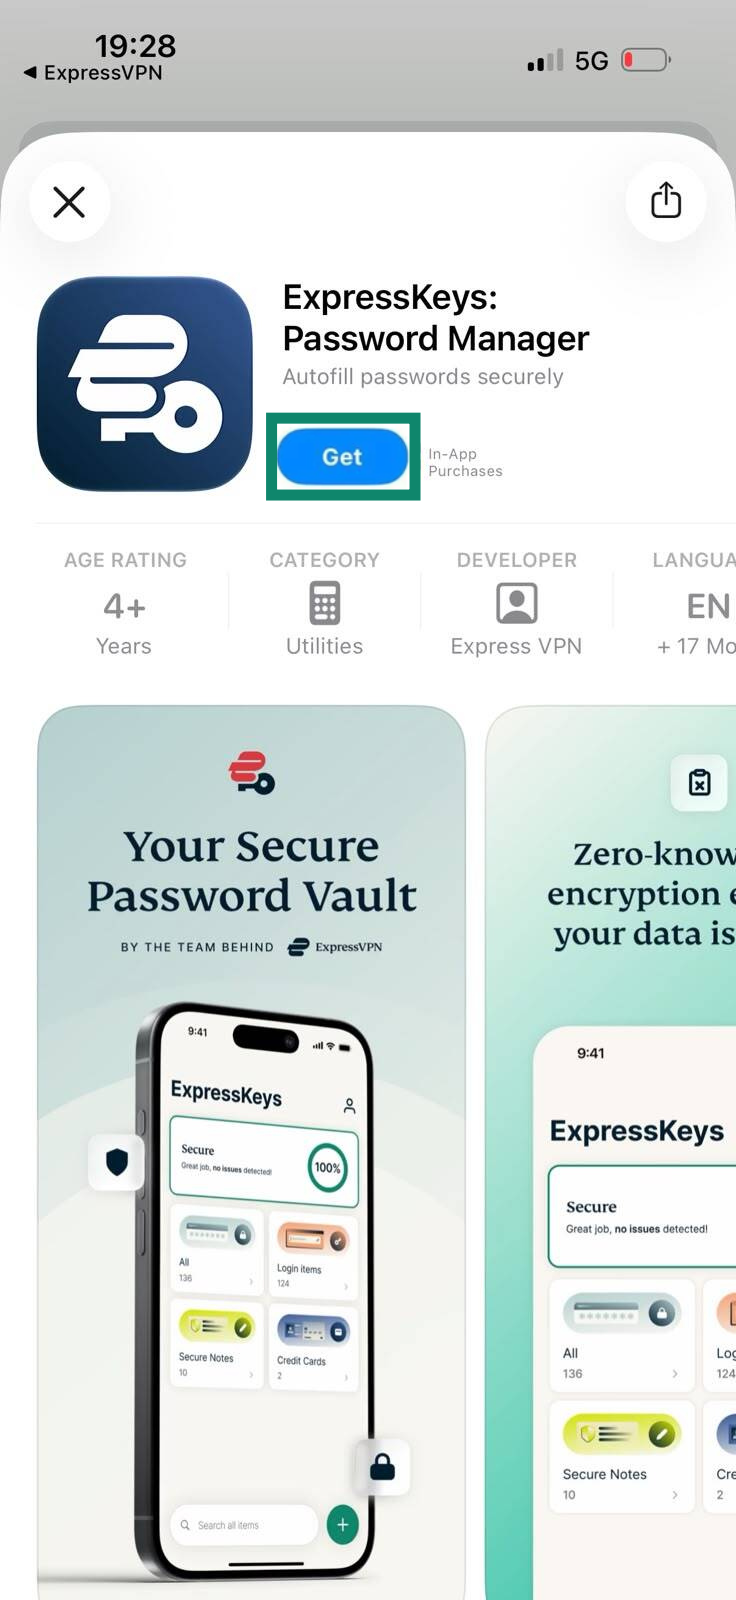
- Open the App Store, search for ExpressKeys, and tap Get. Once the installation finishes, tap Open.
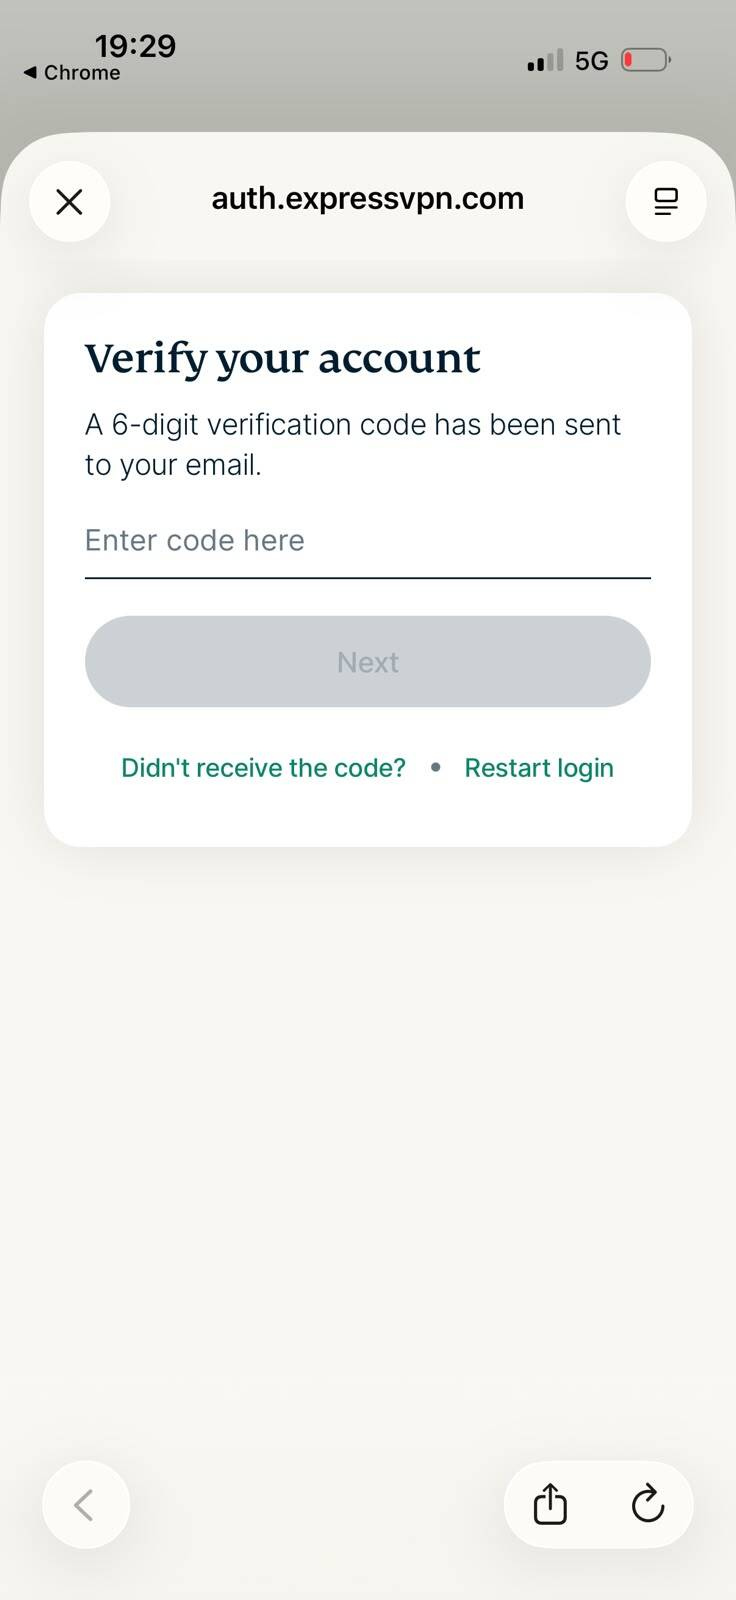
- Tap Sign In. Enter the email address linked to your ExpressVPN account and tap Send Code. Enter the verification code from your email, then tap Next.
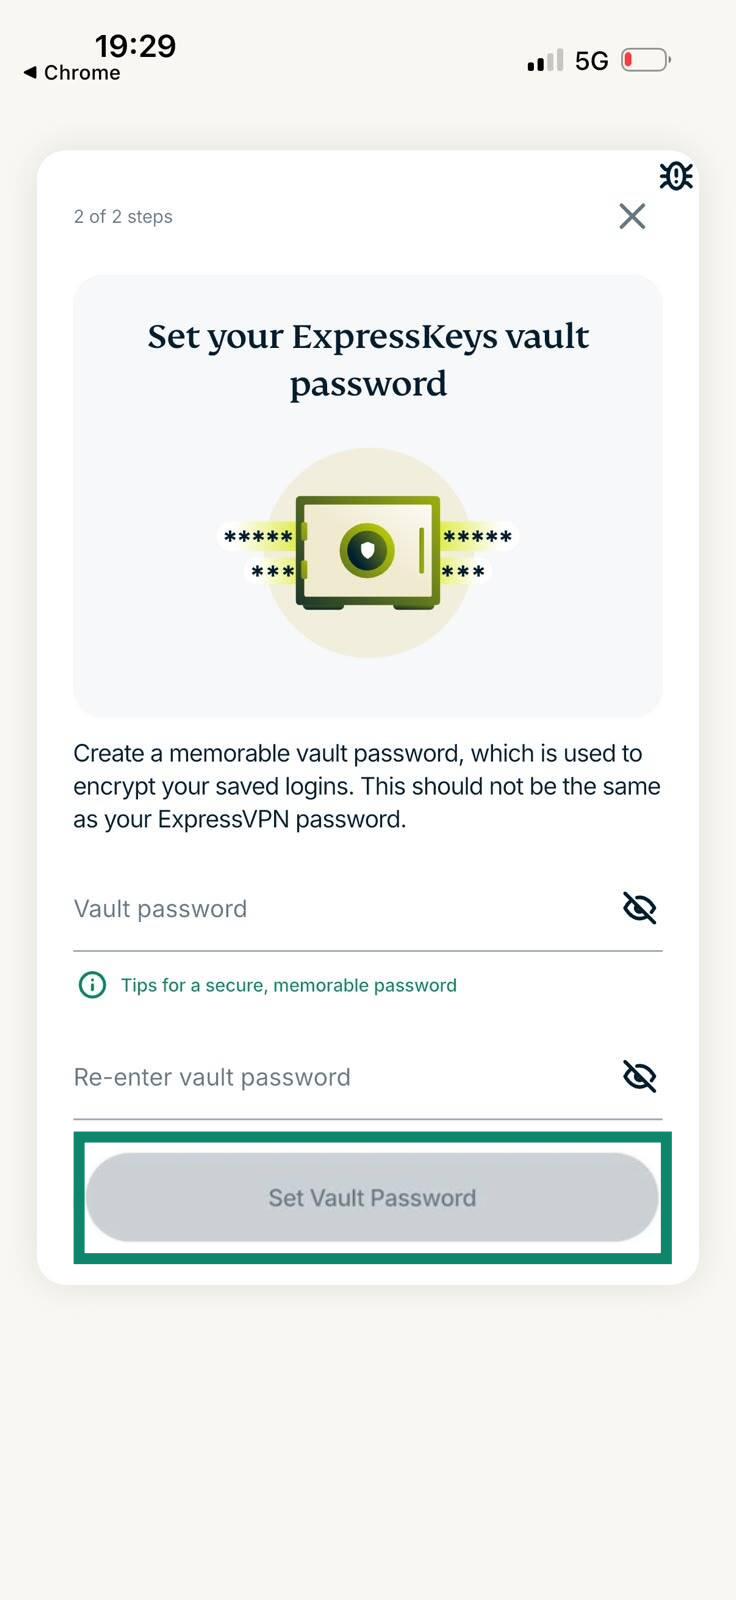
- Enter a vault password, and tap Set Vault Password. This is the only password you need to remember when you use ExpressKeys, so make it long and unique. A passphrase of several randomly chosen, unrelated words is easier to remember than a string of random characters and still hard to guess. Avoid familiar phrases, predictable patterns, and example passphrases published online.
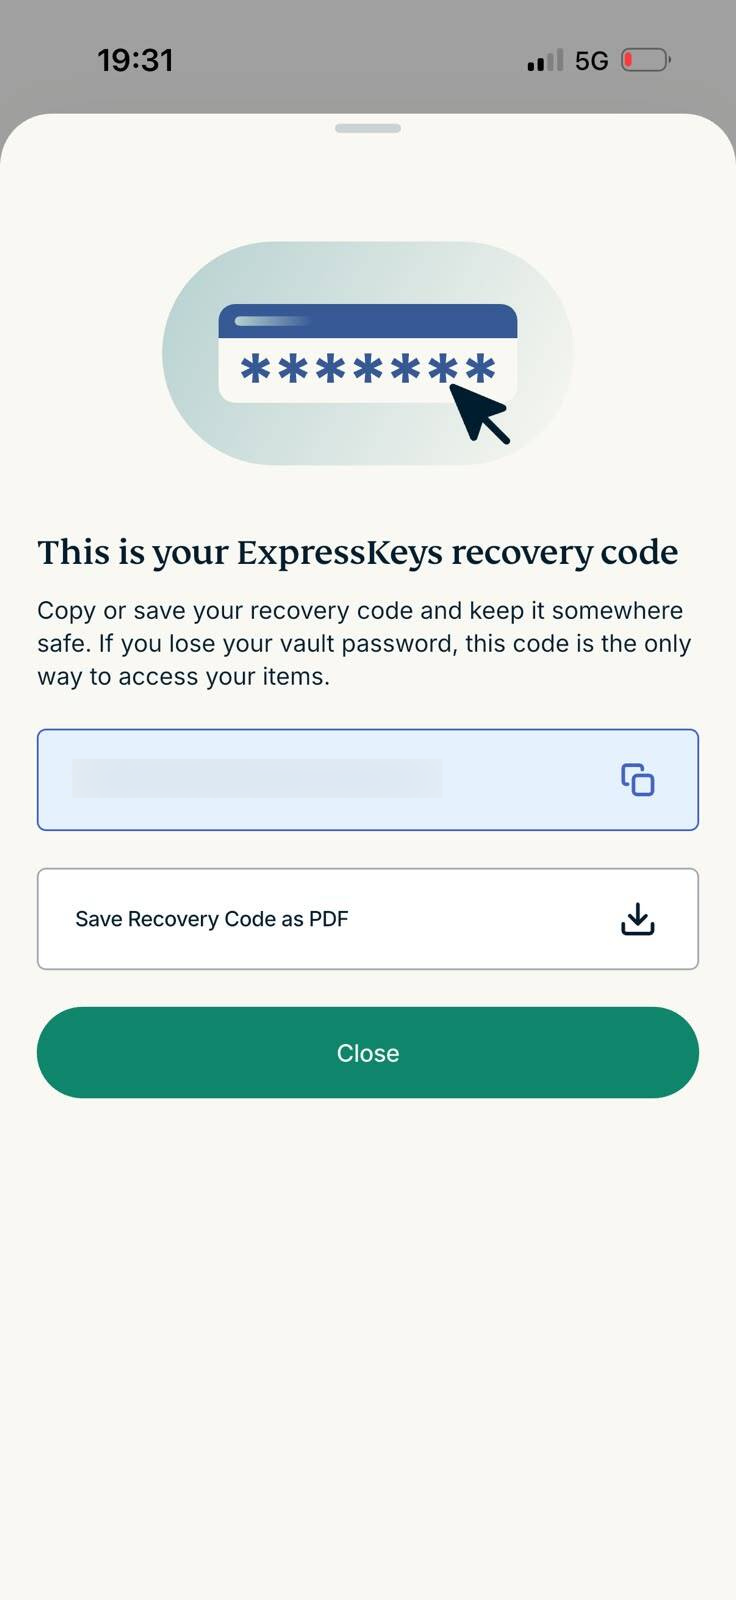
- Save your recovery code somewhere safe, separate from your devices.
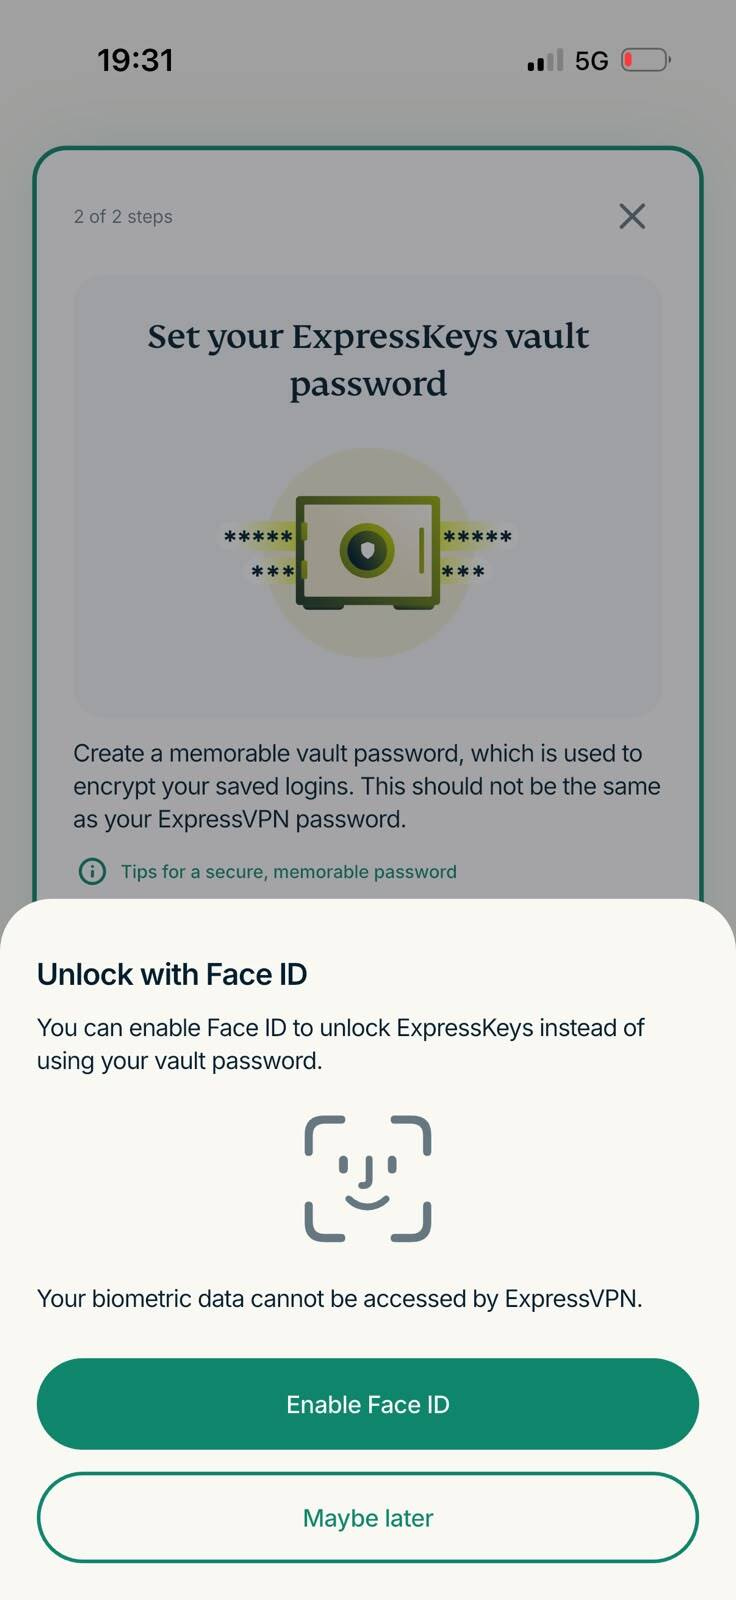
- Optional: Choose Enable Face ID to unlock ExpressKeys with your biometrics instead of typing your vault password.
Create and save a strong Google password in ExpressKeys
ExpressKeys can generate a random password for your Google account and save it to your vault. On iOS:
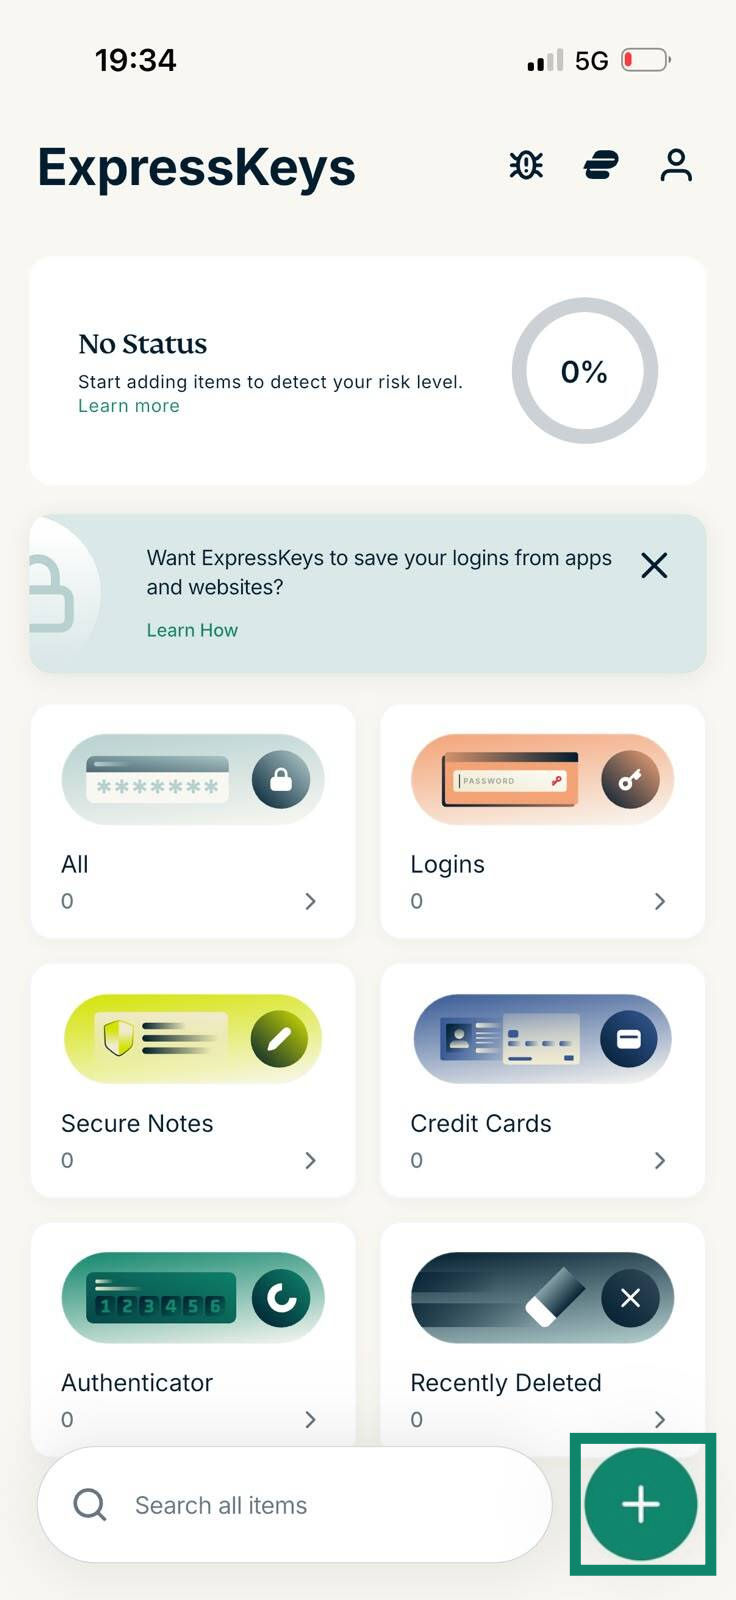
- Open ExpressKeys and unlock your vault. Tap the + icon and select Logins.
- Enter "Google" under Name, your Google email address under Email or username, and "https://accounts.google.com" under Website URL. Under Password, tap Need a new password?
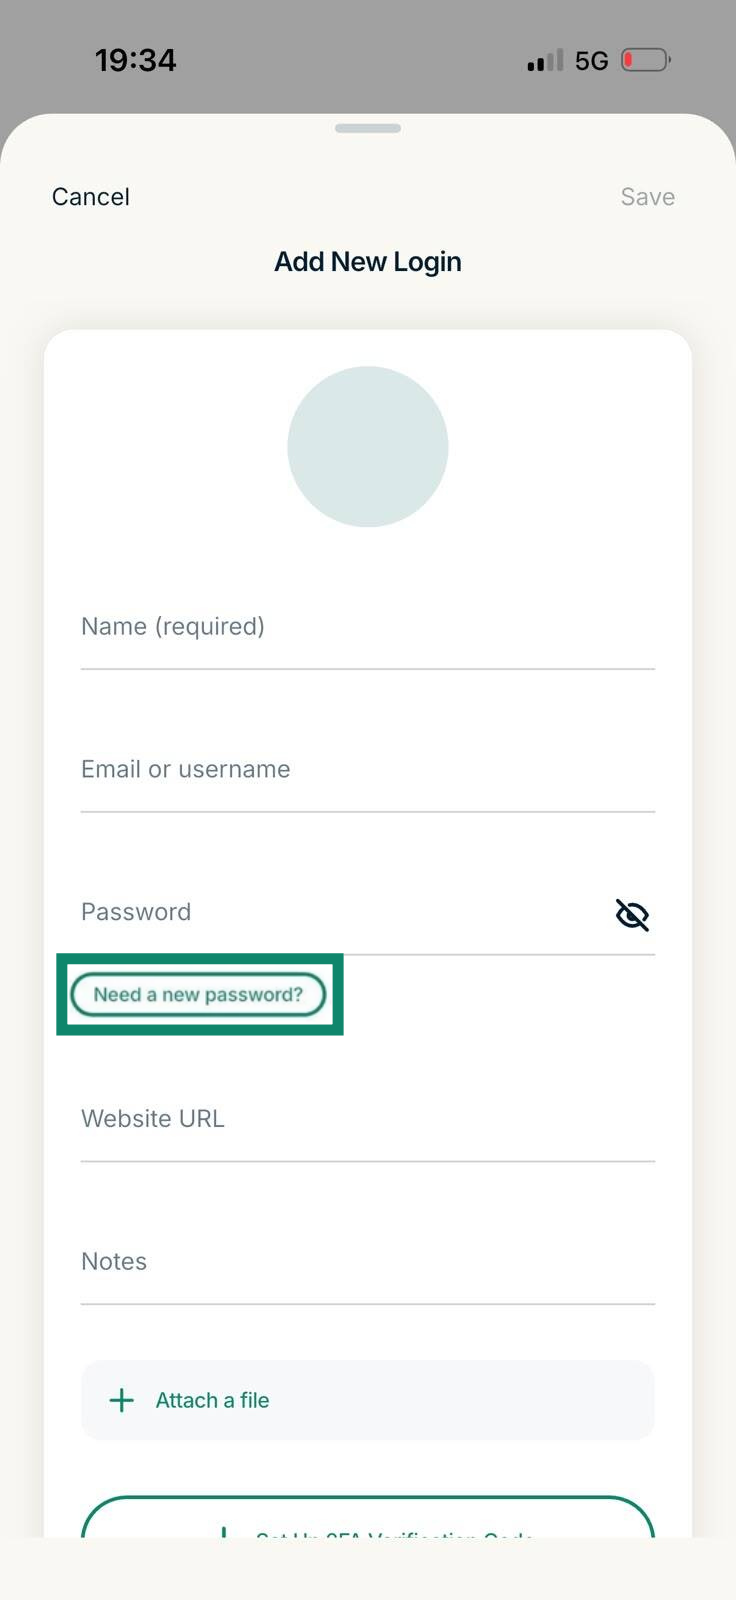
- Adjust the password length and character options, then tap Use This Password.
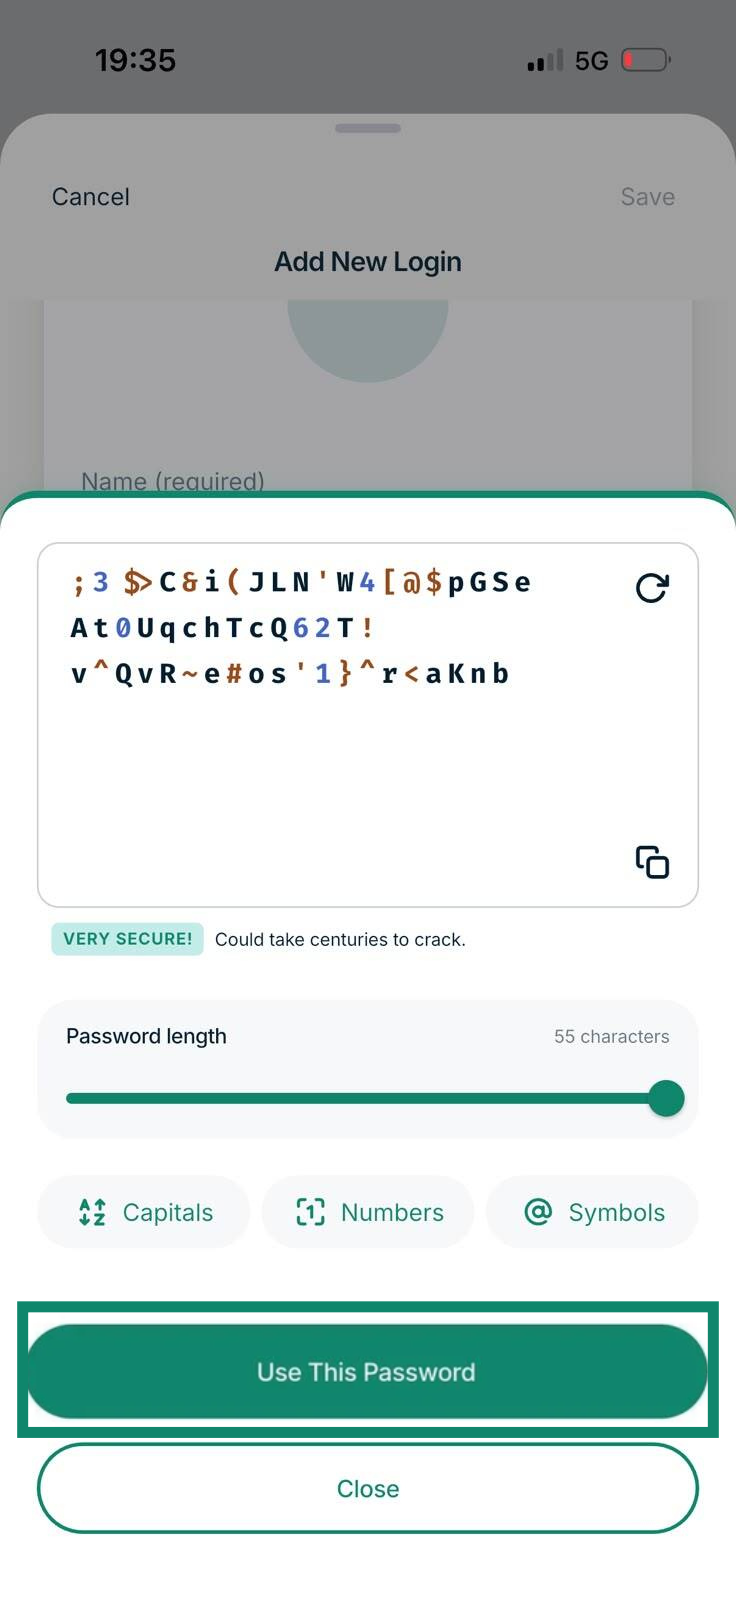
- Tap Save. Saving the login before you change your Google password means you won’t lose the new password.
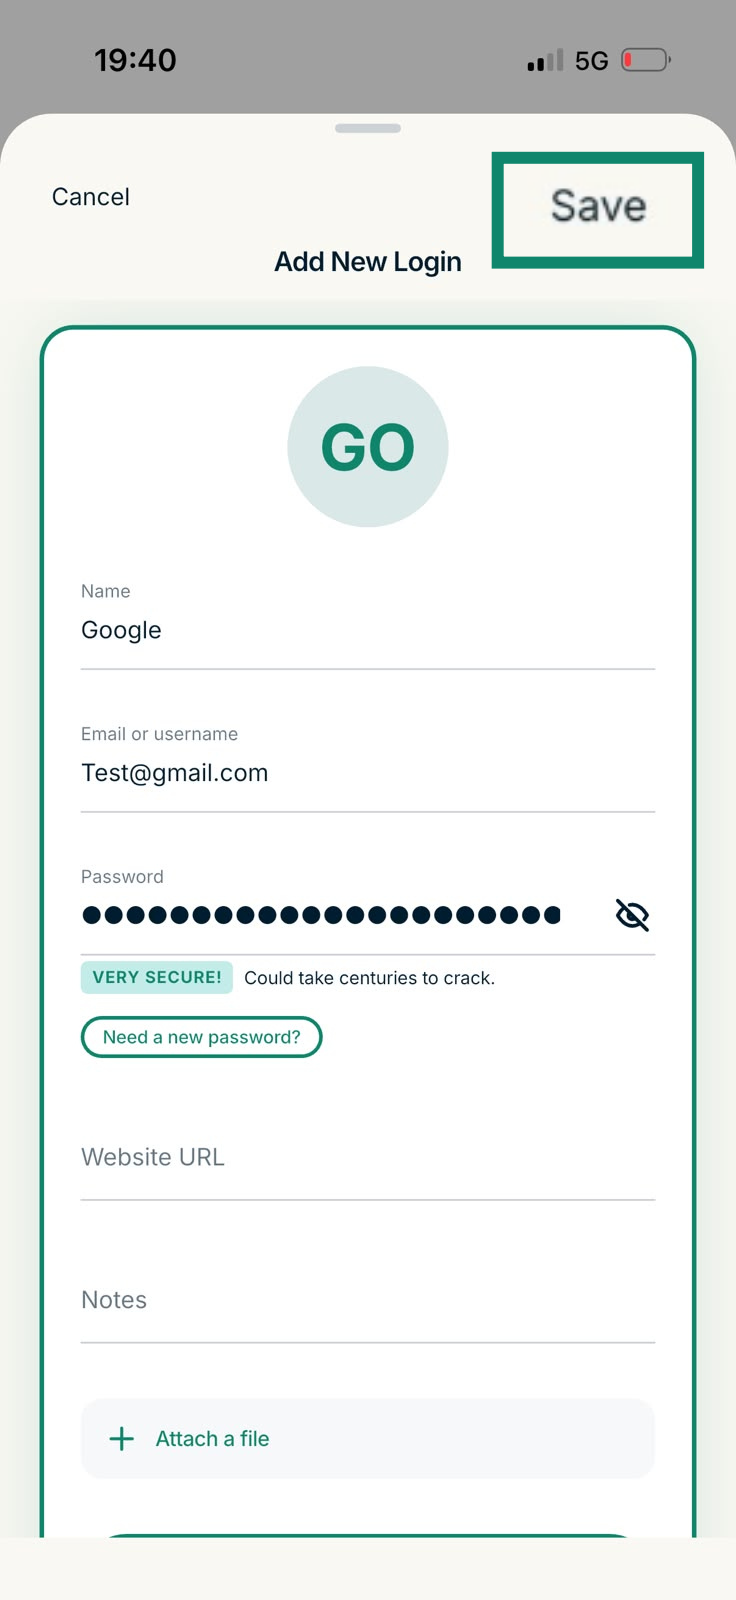
- Copy the password. In your Google Account settings, select Security & sign-in > Password. Verify your identity if Google asks, paste the new password, and select Change Password.
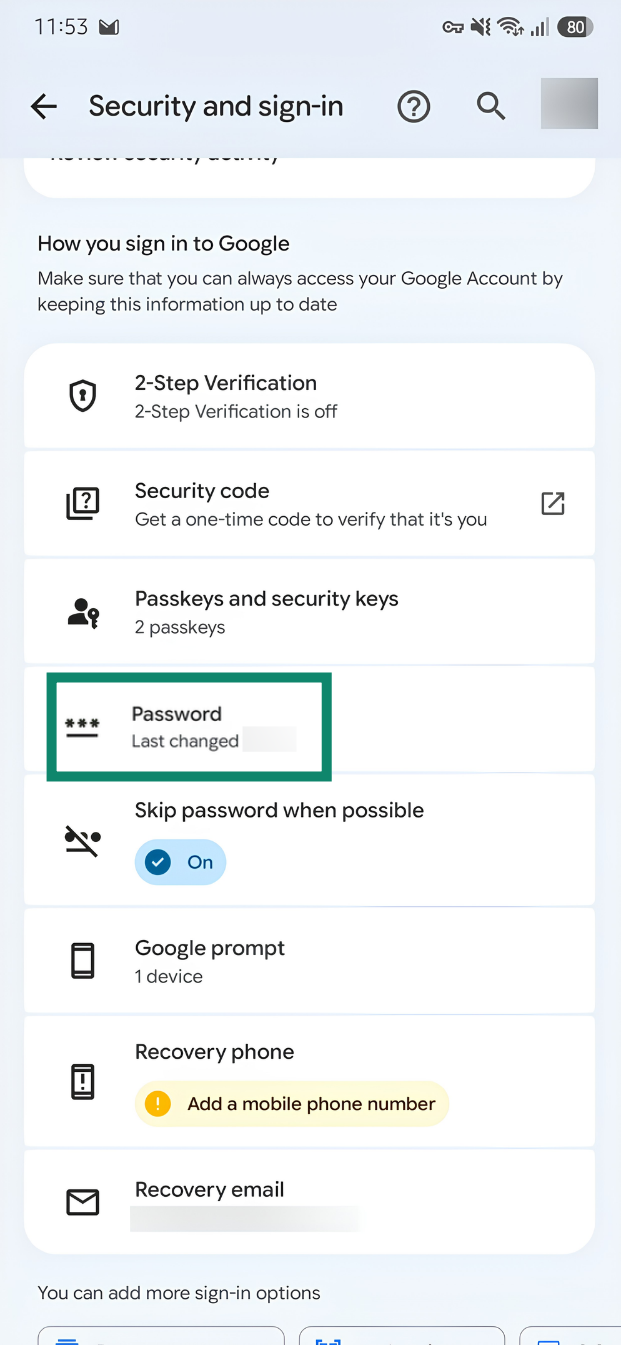
What if Chrome already stores your Google password?
If your Google password is saved in Chrome, you can import it into ExpressKeys instead of entering it manually. On iOS 26 or later, the login moves directly from Chrome to ExpressKeys without exporting a CSV file:
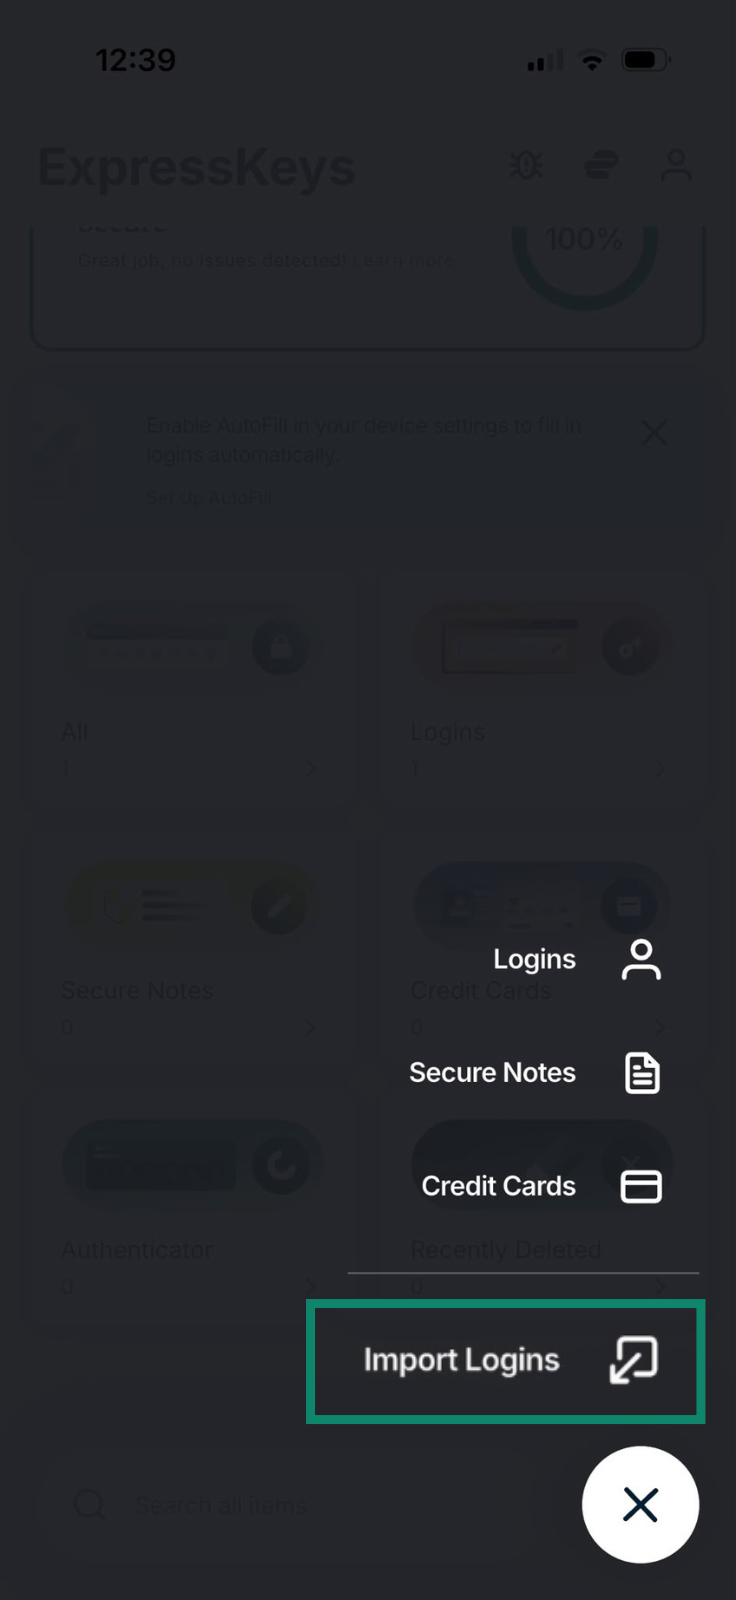
- In ExpressKeys, tap the + icon, then Import Logins.
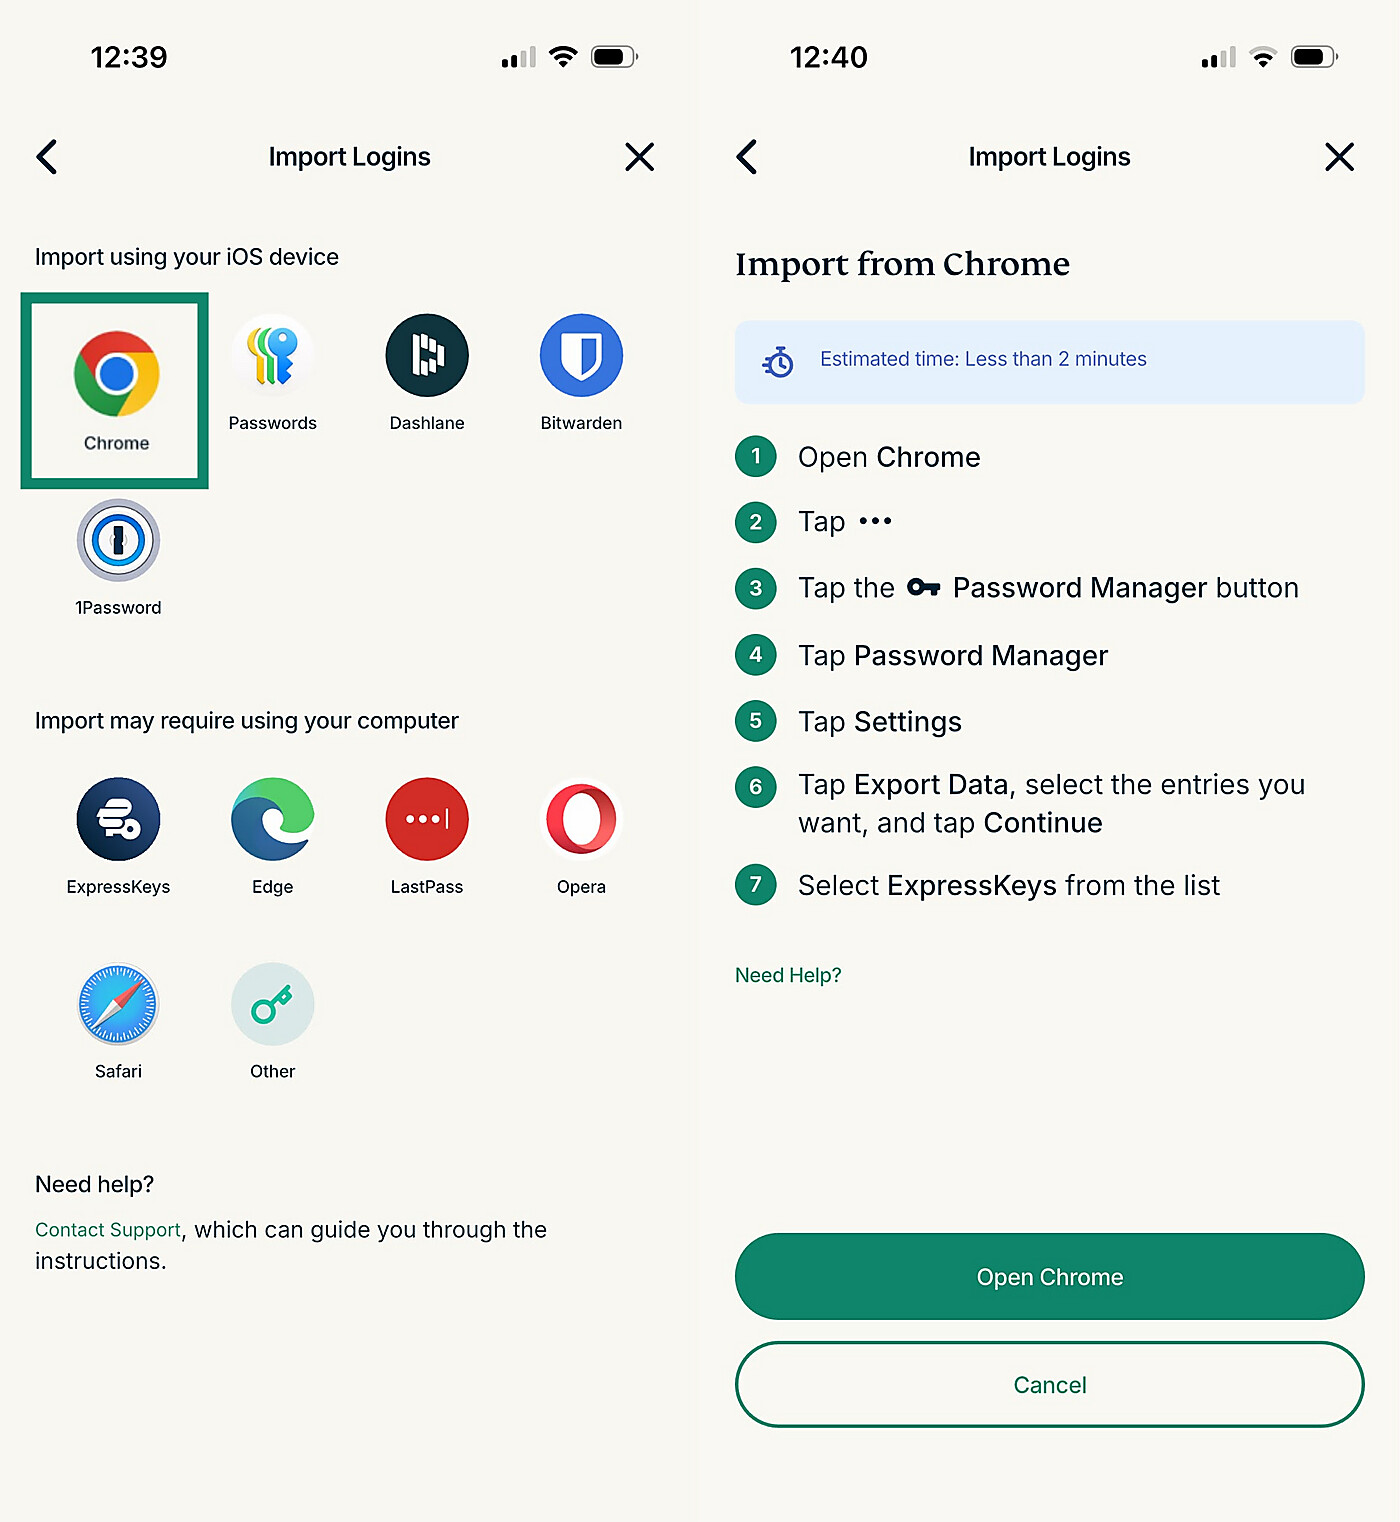
- Tap Chrome > Continue > Open Chrome.
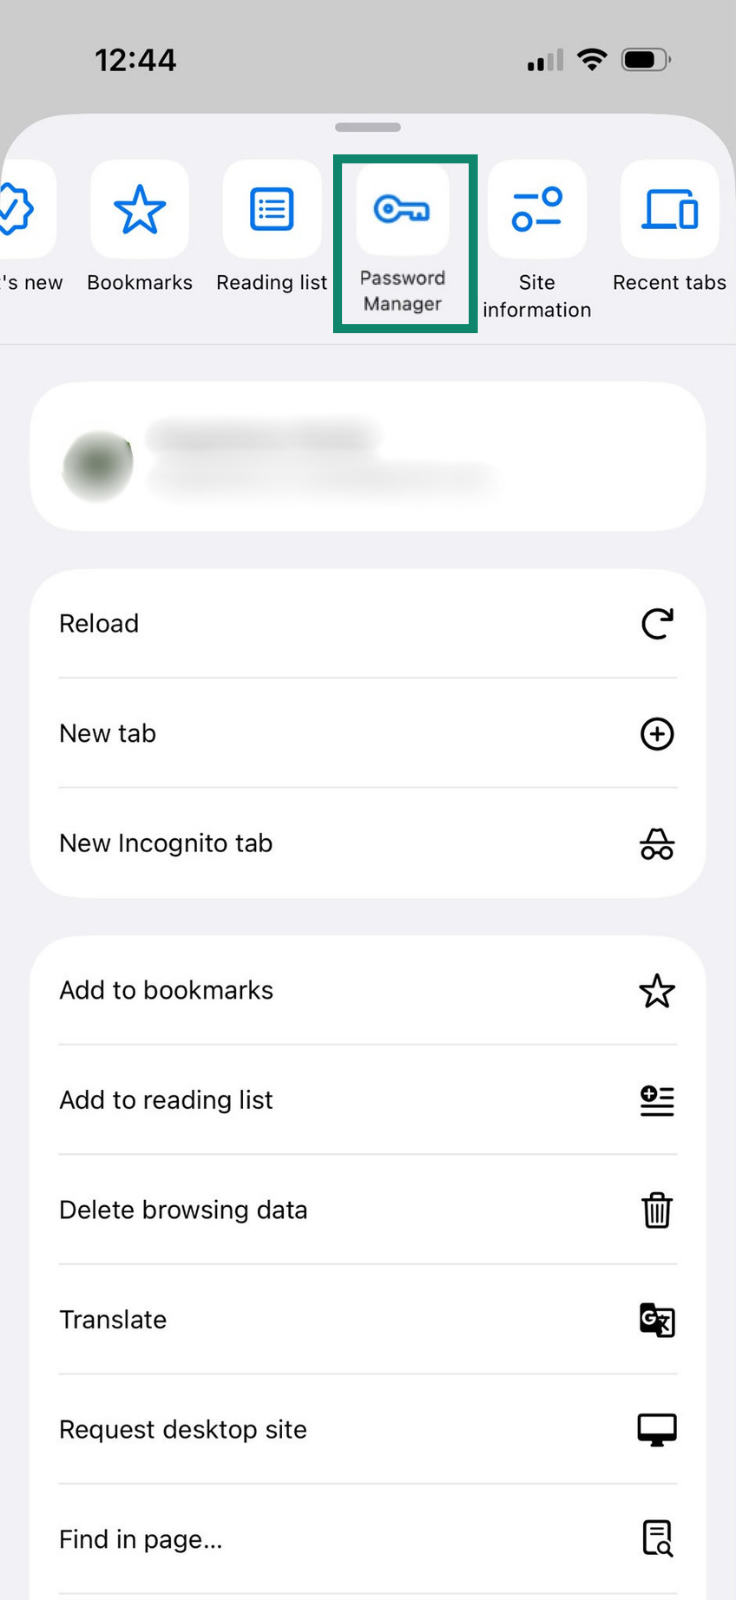
- In Chrome, tap the three-dot menu at the bottom and the Password Manager button.
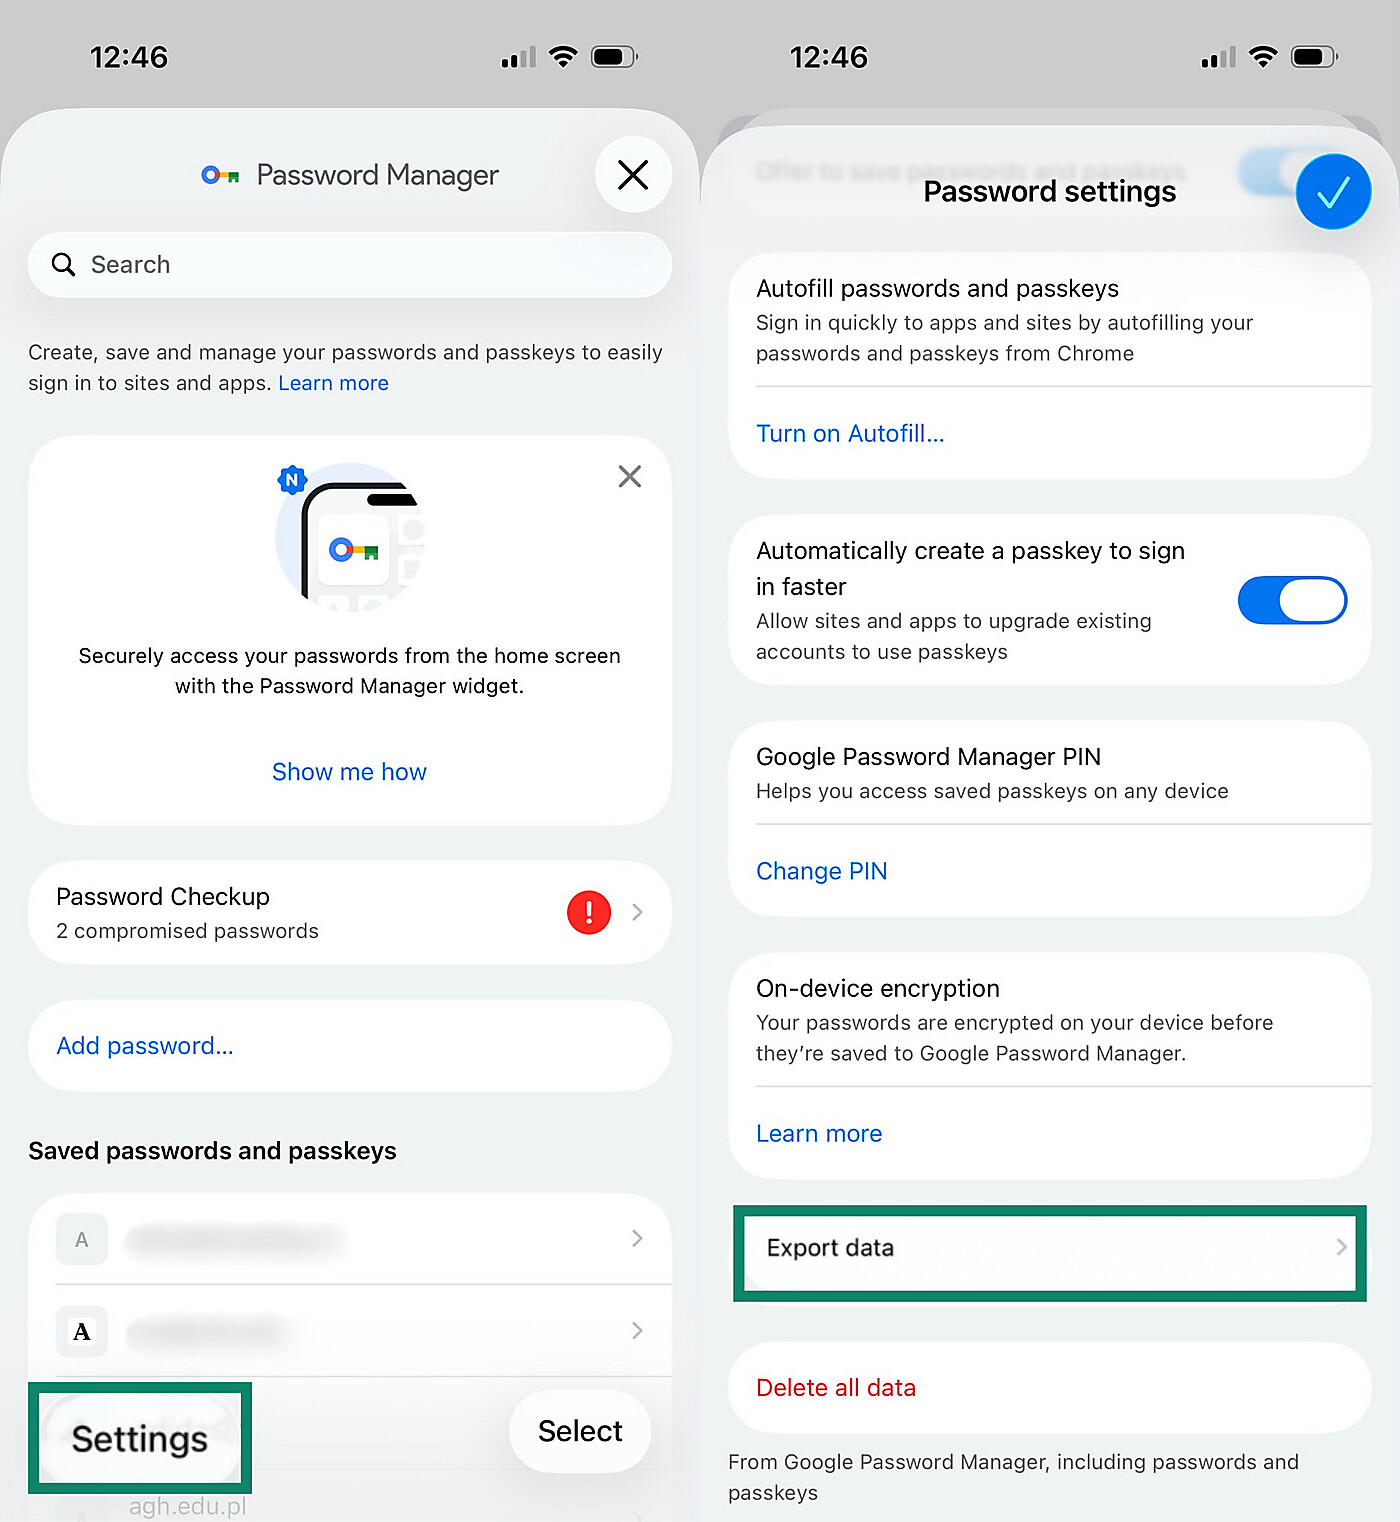
- Tap Settings, then Export Data. Select the entries you want and tap Continue.
- Choose ExpressKeys.
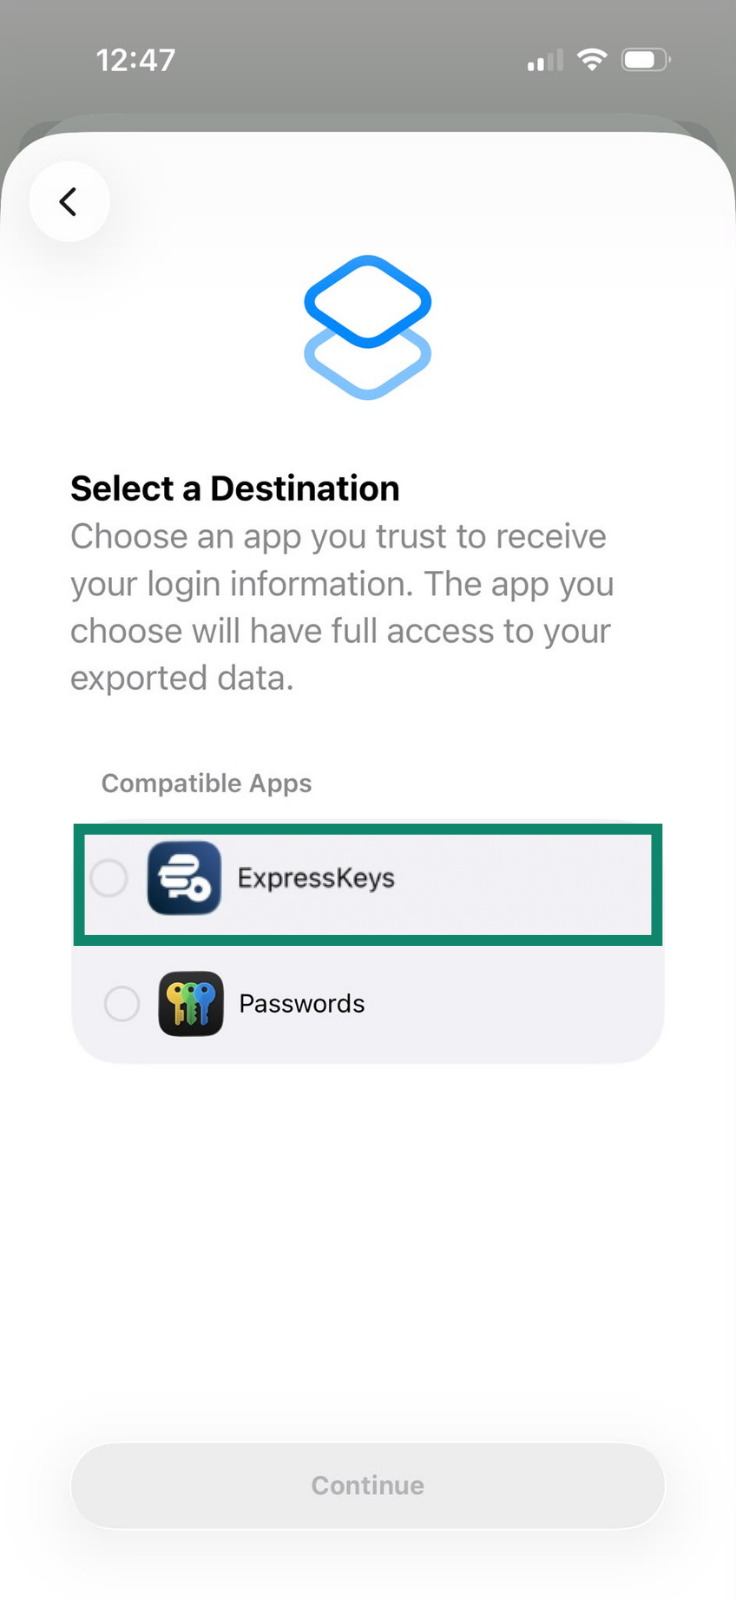
In the ExpressKeys browser extension, macOS, and Android app, you first export your Chrome logins as a CSV file and then import that file into ExpressKeys. The Chrome import guide has the steps. A CSV file stores passwords in plain text, so delete it once the import finishes. If your Google password is in Apple’s Passwords instead, you can import it from Passwords.
Once your Google login appears in ExpressKeys, you can delete it from Chrome. Otherwise, Chrome keeps offering to fill it in, which can interfere with ExpressKeys.
How ExpressKeys autofill works with Google
ExpressKeys autofills a saved login only when the website’s domain matches the one saved in your vault, which helps prevent entering your Google password on fake or lookalike sites. Even on a matching page, the login is filled only after you unlock your vault, select the suggestion, and confirm.
If ExpressKeys doesn’t offer your Google login on a page that looks like Google’s sign-in page, check the address in your browser before you enter your password.

Note: The macOS app doesn’t support autofill yet, so on a Mac, use the ExpressKeys browser extension to fill in your Google login.
Check if your Google password is weak, reused, or exposed
ExpressKeys Password Health gives your saved logins a security score and flags passwords that are weak, reused across accounts, or exposed. A password counts as exposed when it has been found in a list of passwords online, often after a data breach.
Password Health also flags logins saved with an insecure HTTP address and accounts without two-factor authentication (2FA). ExpressKeys checks your passwords on your device, so they never leave it.
To check your Google login:
- Open ExpressKeys and find the Password Health widget at the top of the home screen. It shows your current rating, from High risk to Secure. Tap Learn more to view your password security details.
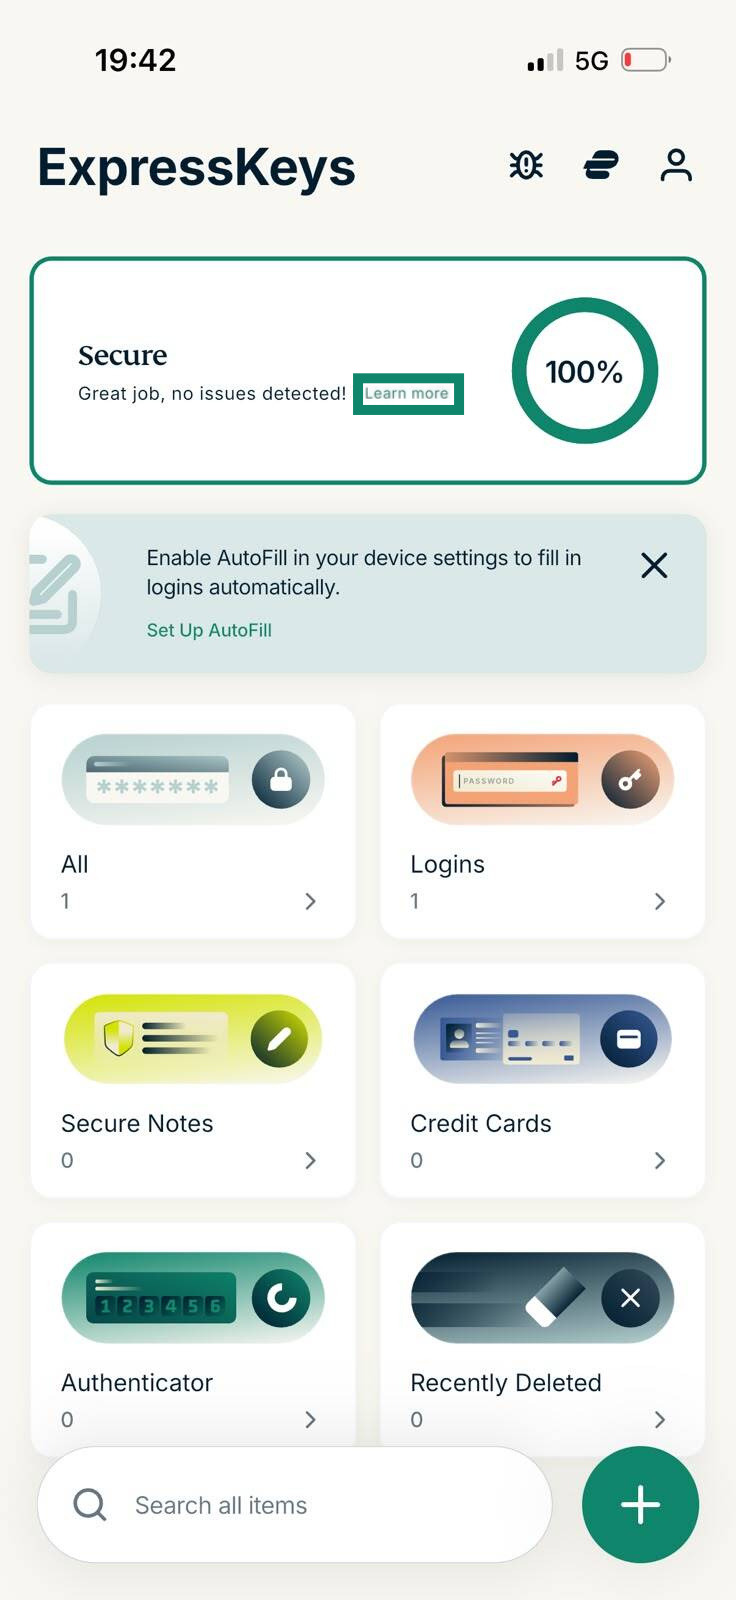
- Review the issues ExpressKeys lists and check whether your Google login is among them. If it is, replace the password with a new one generated in ExpressKeys, save the login, and then change the password in your Google Account settings.
Store your Google 2-Step Verification codes in ExpressKeys
Google’s 2-Step Verification asks for a second sign-in step after your password, such as a one-time code. ExpressKeys can generate these codes for your Google account, so you don’t need a separate authenticator app. Each code changes every 30 seconds.
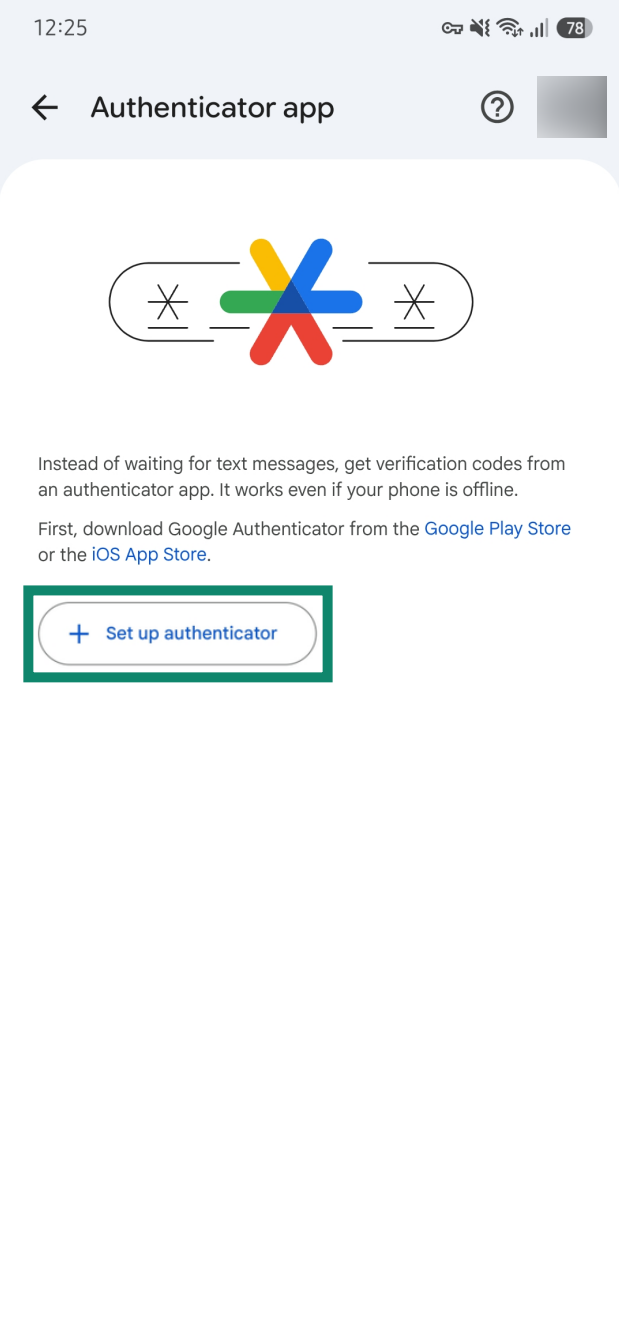
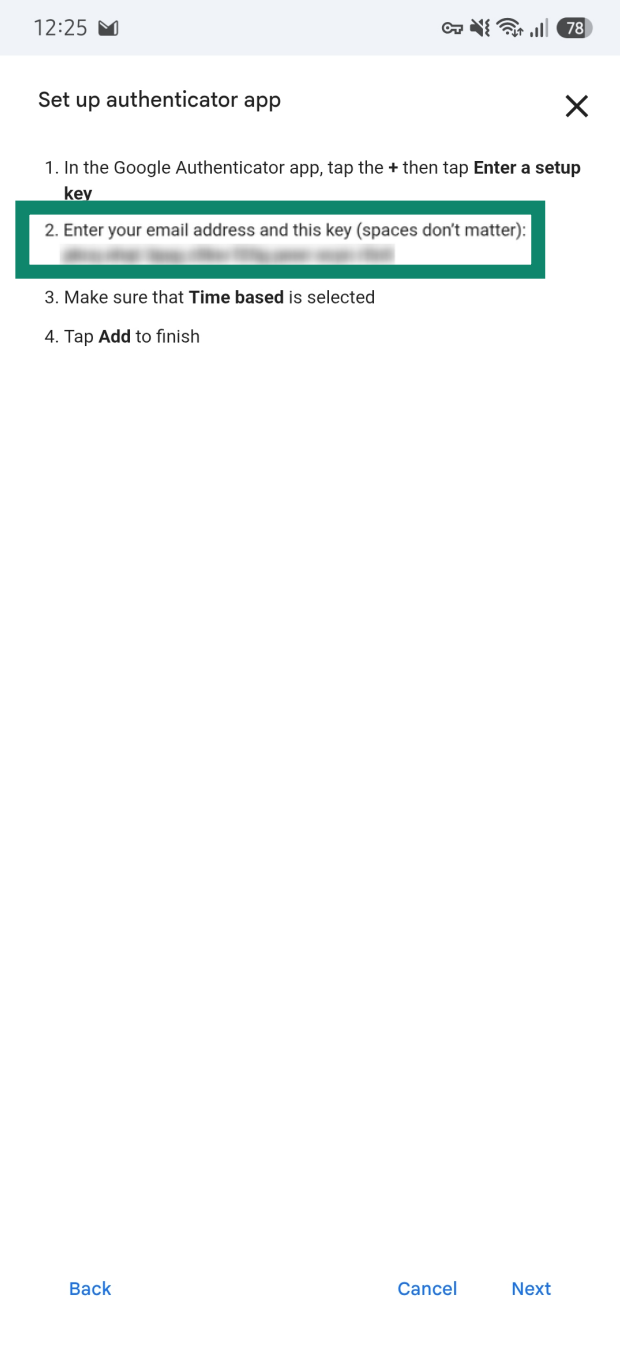
- Open your Google Account’s authenticator settings and select Set up authenticator. If you already use an authenticator app for your Google account, select Change authenticator app instead. The codes in your old app then stop working for Google.
- Select Can’t scan it?
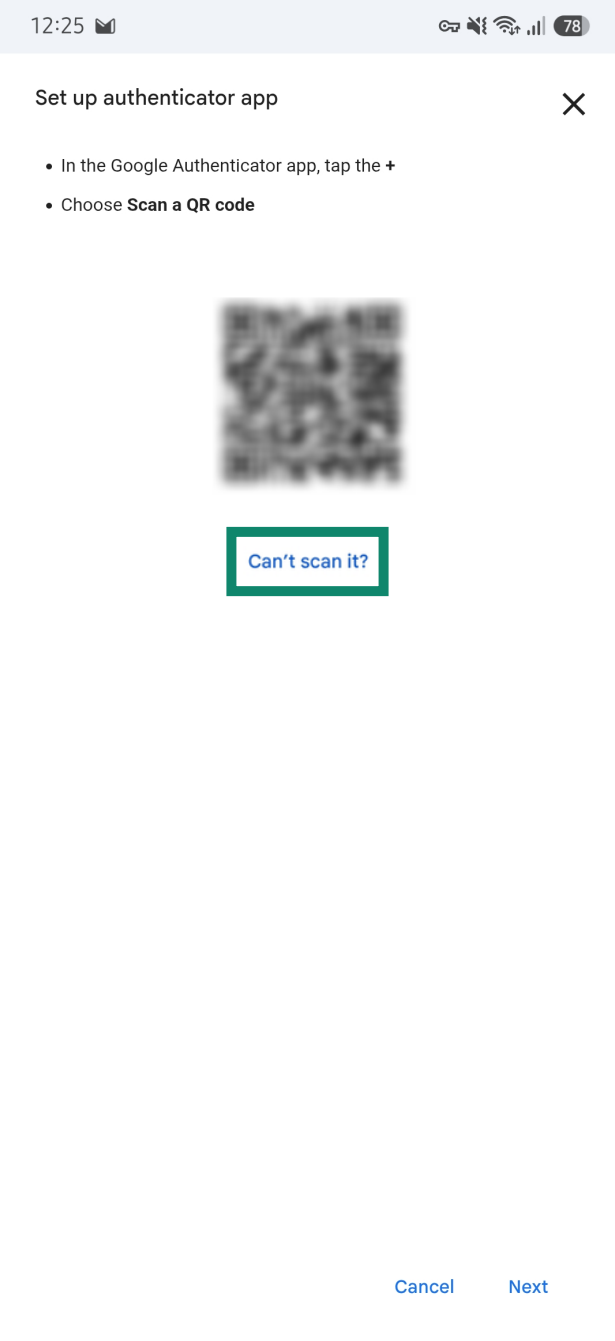
- Copy the setup key Google shows.
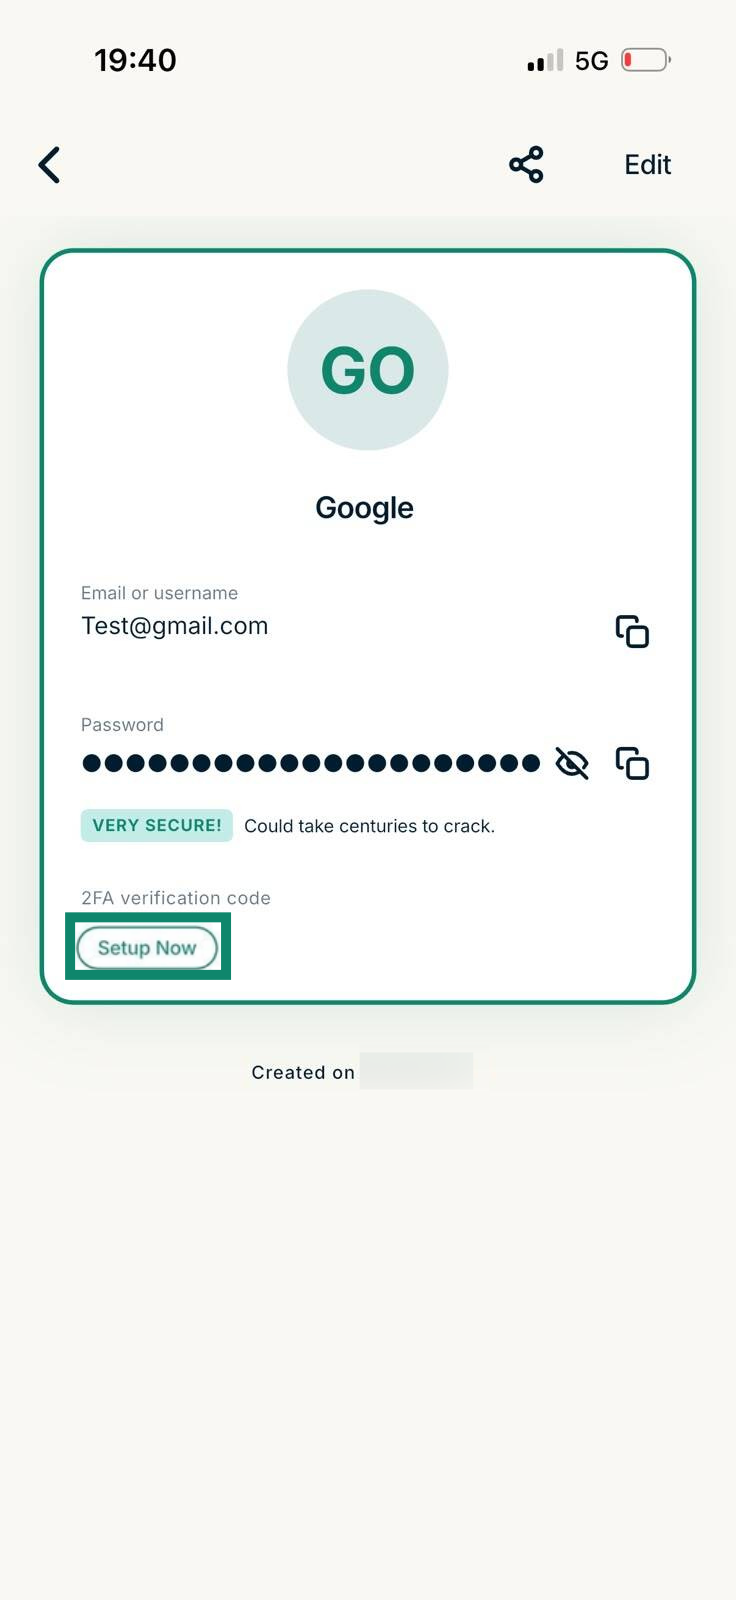
- In ExpressKeys, open your Google login and tap Setup Now under 2FA verification code. Paste the setup key and tap Confirm.
- Copy the code ExpressKeys now shows for your Google login, enter it on Google’s setup screen, and confirm.
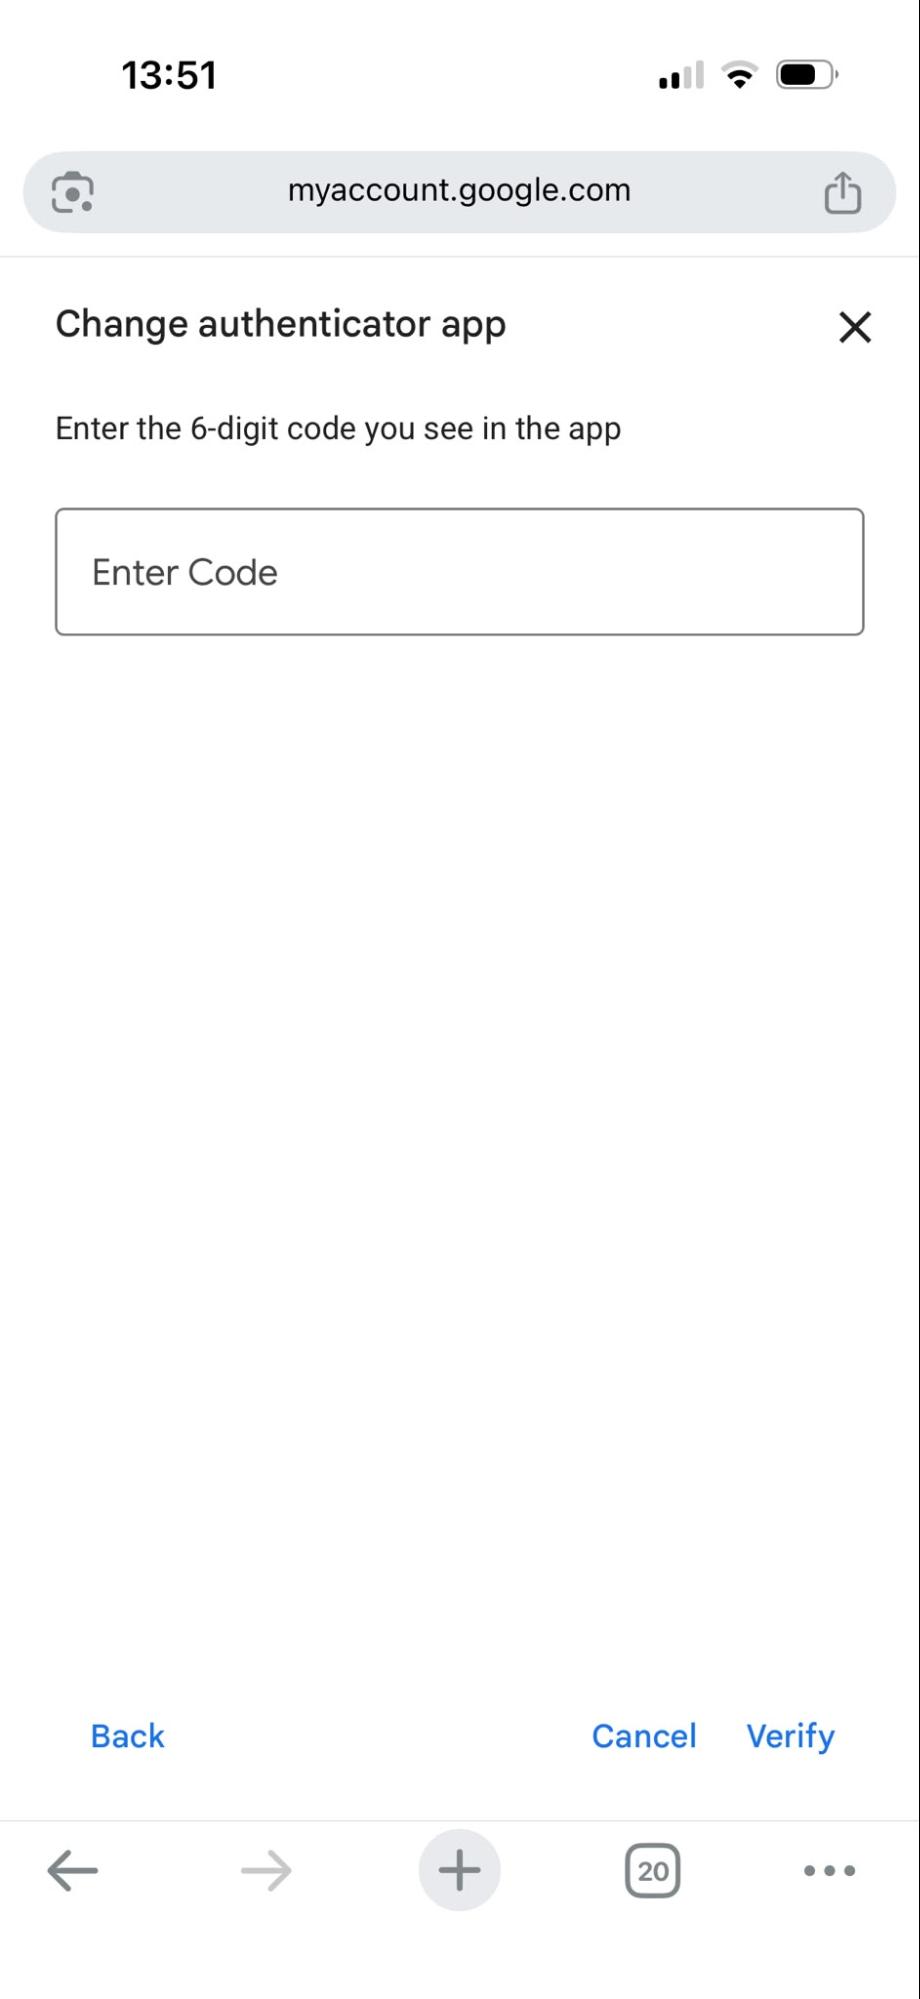
Google notes that it can take up to 7 days for the authenticator to appear as a sign-in option for your account.
To find your codes later, open the Authenticator tab in ExpressKeys or your Google login. With autofill turned on, ExpressKeys offers to fill in your Google username, password, and 2FA code together. Check out the 2FA codes guide for more details.
Should you keep your Google password and verification codes together?
Keeping your Google password and verification codes in ExpressKeys means one app handles both sign-in steps, which makes them easier to manage. It also puts both factors in the same vault. The vault only opens with your vault password or biometrics, but anyone who gets into an unlocked vault could see both.
For more separation, you can keep your Google verification codes in a separate authenticator app or use a hardware security key as your second step. Whichever method you use, save your Google backup codes somewhere safe, so you can still sign in if you lose access to your usual second step.
Use a passkey for your Google account
A passkey lets you sign into Google with your device’s screen lock, such as Face ID, a fingerprint, or a PIN, instead of typing your password. Passkeys can help protect against phishing and credential theft.
ExpressKeys can create, save, and use passkeys on Android, iOS, and in its Chrome and Firefox browser extensions. To create a passkey with ExpressKeys, autofill must be turned on for ExpressKeys on your device.
To add a passkey to your Google account on iOS:
- Go to your Google Account’s passkey settings and tap Create a passkey, then Create a passkey again.
- When your device asks to save the passkey, tap Add Passkey.
- Unlock ExpressKeys with your vault password, Face ID, or Touch ID.
- Open Logins in ExpressKeys and select your Google login. If ExpressKeys detects the new passkey, tap Merge at the top of the login, then Merge again to keep the password and passkey in one entry.
The next time you sign into Google, ExpressKeys offers to sign you in with the saved passkey. The passkey guide covers the steps for other devices.
Need a safe place for your Google password?
ExpressKeys generates a strong Google password, stores it in an encrypted vault that syncs across your devices, and flags it if it’s weak, reused, or exposed.
Store your Google password with ExpressKeys
Included with eligible ExpressVPN plans, with a 30-day money-back guarantee for new users.